Note: This blog post is the long version of the article. For a short HOWTO better visit the Squeezebox forum post.
Prelude
Welcome to another chapter of the series “Making devices do things they weren’t designed for” ;-)
Before you get too excited because of the title I should probably warn you: This solution is a hack. When following this guide you will be bypassing SqueezePlay (meaning no integration into the devices’ GUI) and the solution is not really straightforward either (i.e. more complicated than you may be willing to accept). Also a decent amount of Linux knowledge is required.
Looking on the bright side: You will be able to watch videos after this tutorial - you may even want to experiment yourself and find more effective ways to do some things or work on the integration into SqueezePlay and Logitech Media Server :-)
This article was written using a Squeezebox Radio, however I don’t see any reason why it shouldn’t also work for the Squeezbox Touch or Squeezebox Controller. If you try it with any of those please drop me a note if it worked!
The goal
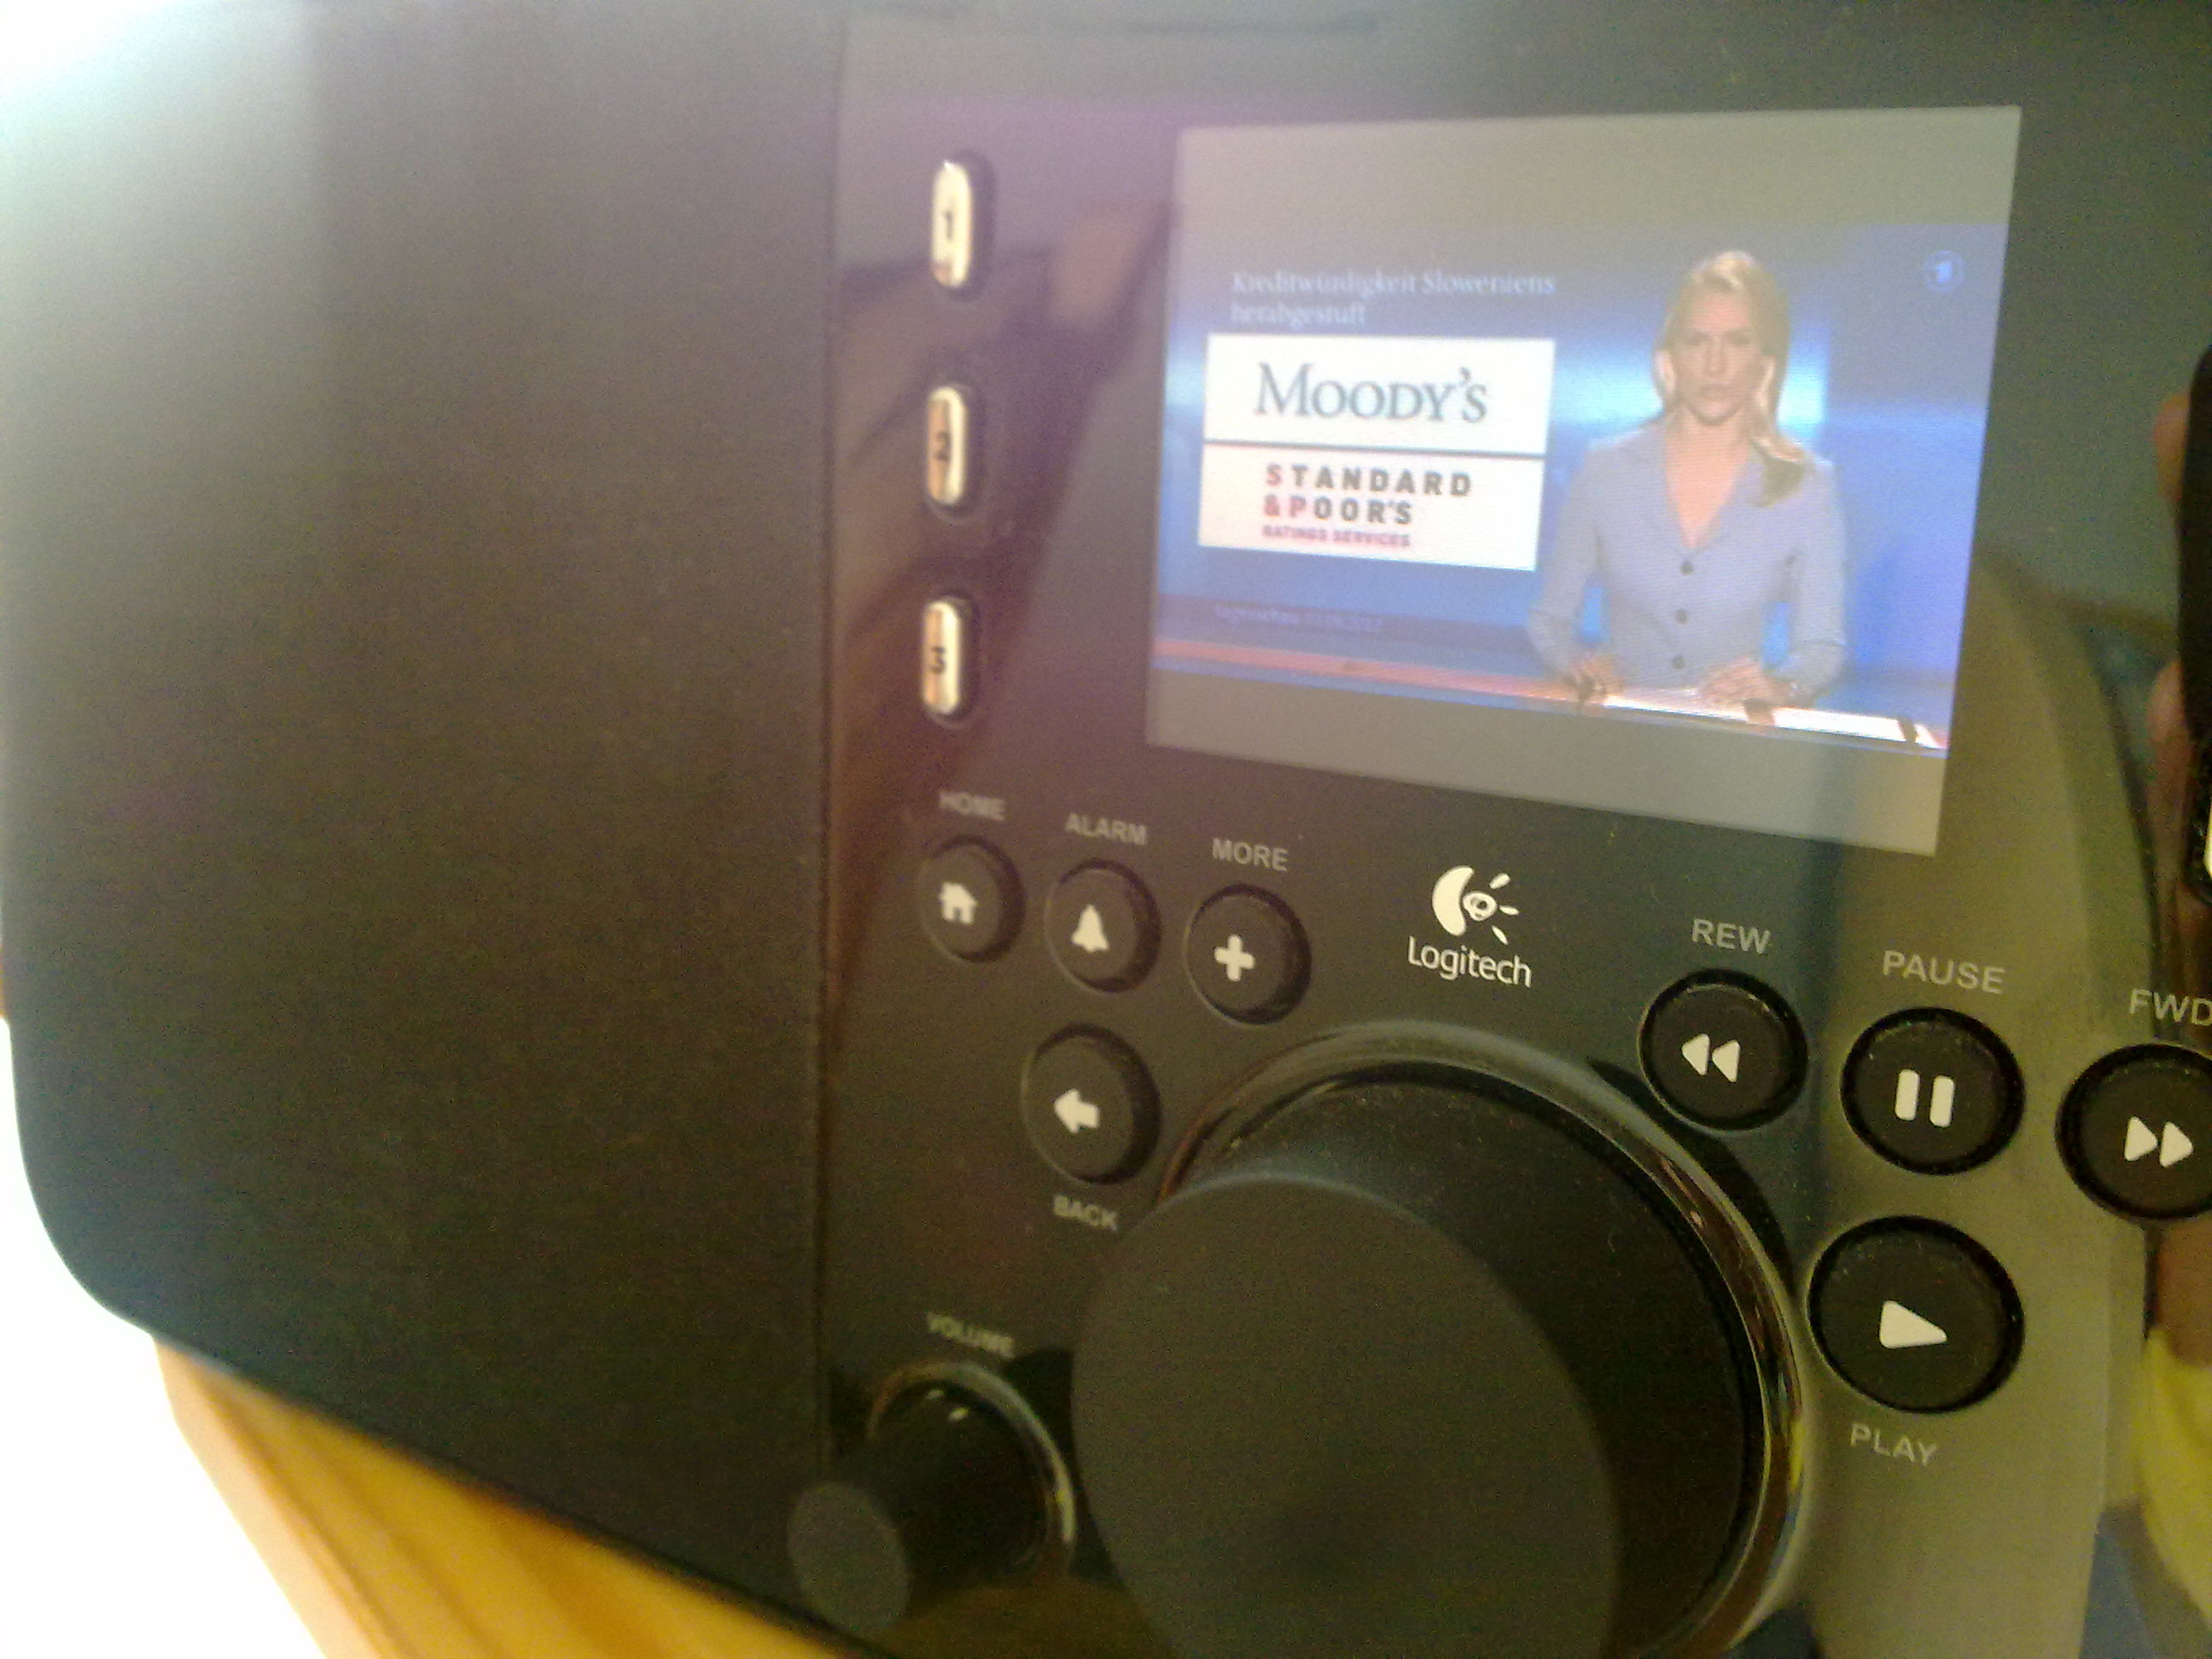
Watching videos on the Squeezebox!
The hardware
Newer Squeezebox devices (i.e. all devices with a LCD display) have an ARM processor and are running an embedded Linux. The devices aren’t really powerful - Radio has a 400 MHz CPU with integrated audio acceleration, but no floating point or video acceleration unit. In fact it is way too slow to play most of today’s video contents from the web, as most newer codecs (like MPEG4/H.264 or OGG Theora) require a lot of computing power.
The embedded Linux system is very minimal and mainly exists to run SqueezePlay (called jive in the process list), using a framebuffer driver for graphics and an ALSA driver for audio output. The system itself, using kernel 2.6.26.8, is stored on 128MB of flash memory, which is formatted with UBIFS.
To access the device we will be using SSH (if you are on Windows you may use Putty or similar programs for this).
Choosing a video player
We want to play videos, so we have to find some video playback program that can be used on the Squeezebox. There are several good video players for Linux, and most of them will run on Squeezebox’ ARM architecture. The only additional requirement is framebuffer output, as that is everything the Squeezebox has. Several candidates match these requirements, among them are
In this tutorial we will be using MPlayer because it has a few advantages which make it perfect for a quick hack:
- The package is self contained, i.e. it already contains all required libraries, making it much easier to compile
- Most of the libraries can be statically linked into the binary, so only a few additional files are needed on the Squeezebox.
Compiling MPlayer
Note: This step can be quite a lengthy process, so you may just skip it and download the binaries I have built from here instead: http://digitalimagec … s/mplayer_arm.tar.gz
(You may also try to use a mplayer binary from another Linux distribution for ARM, however those usually have a lot of dependencies…)
First you have to set up a cross compile environment to build MPlayer for the Squeezebox. Please follow the instructions from SqueezeOS Build Instructions Wiki page to do so.
When you have set up your environment download the MPlayer source and extract it. Change to the directory containing the MPlayer source and enter the following commands:
SQUEEZEOS="<enter path containing the poky directory from your SqueezeOS checkout>"
./configure --enable-cross-compile --host-cc=gcc --cc="${SQUEEZEOS}/poky/build/tmp-jive/cross/armv5te/bin/arm-none-linux-gnueabi-gcc" --target=arm-linux --enable-alsa --extra-cflags=-I"${SQUEEZEOS}/poky/build/tmp-jive/staging/armv5te-none-linux-gnueabi/usr/include" --extra-ldflags=-L"${SQUEEZEOS}/poky/build/tmp-jive/staging/armv5te-none-linux-gnueabi/usr/lib"
make
Your will find the resulting binary in the root directory of the MPlayer source. You will also need three libraries from your SqueezeOS build: libncurses.so.5.0.4, liblzo2.so.2.0.0 and libjpeg.so.62.0.0:
MPLAYERFILES="<enter a path where you want to store the files for your Squeezebox>"
cp mplayer "$MPLAYERFILES"
cd "$MPLAYERFILES"
cp "${SQUEEZEOS}/poky/build/tmp-jive/work/armv5te-none-linux-gnueabi/ncurses-5.4-r11/image/usr/lib/libncurses.so.5.0.4" libncurses.so.5
cp "${SQUEEZEOS}/poky/build/tmp-jive/work/armv5te-none-linux-gnueabi/lzo-2.02-r1/image/usr/lib/liblzo2.so.2.0.0" liblzo2.so.2
cp "${SQUEEZEOS}/poky/build/tmp-jive/work/armv5te-none-linux-gnueabi/jpeg-6b-r6/image/usr/lib/libjpeg.so.62.0.0" libjpeg.so.62
(The version numbers of the libraries are from SqueezeOS 7.7, change them if you use another version.)
Finding a /home
Now that we finally got our binaries we just have to copy them to our Squeezebox and use them. But - surprise - there’s trouble ahead: The root file system doesn’t have enough space to store our files. And even worse: We can’t change that: The (old) kernel doesn’t support mounting more than one UBIFS file system, so even if we add another UBIFS volume using unallocated space we will not be able to mount it - see http://lists.infrade … 009-July/026422.html for details.
However ‘df’ reveals another possible location for our files: /dev. When looking at the ‘mount’ output we see can see that it’s mounted with tmpfs, so we will loose all files from there after a reboot - but hey, we don’t have any other chance, do we?
So for now, copy the mplayer binary and the library files to your Squeezebox:
scp "$MPLAYERFILES"/* root@<IP of your Squeezebox>:/dev
Trying to play a video
If you want you can try to play a video now. First of all make sure that your device is turned on (i.e. you can see the menu). Now log into your Squeezebox and enter the following commands:
cd /dev
export LD_LIBRARY_PATH="$LD_LIBRARY_PATH":/dev
./mplayer http://archive.org/download/test-mpeg/test-mpeg_512kb.mp4
Not very successful, is it? Press Ctrl+C to cancel the video. It seems that the video won’t start because the audio device cannot be opened. Looking around which process is blocking the device we see that it’s Jive. Rings a bell? This is the Squeezebox GUI…
Let’s try to turn it off:
/etc/init.d/squeezeplay stopwdog     # Important: Always use the option "stopwdog" (instead of "stop"), otherwise your Squeezebox will reboot after a few seconds.
./mplayer http://archive.org/download/test-mpeg/test-mpeg_512kb.mp4
Well… At least we are seeing something. You may have noted a few things:
- The picture is rotated
- Even if it would have the correct orientation it would be too big
- The movie is way too slow
- The sound is way too loud (if there was any)
Let’s try to optimize things a bit:
./mplayer -volume 50 -vf rotate=2,scale=240:320 -vfm ffmpeg -vo fbdev -framedrop http://archive.org/download/test-mpeg/test-mpeg_512kb.mp4
Still too slow, but we’re coming closer otherwise.
Let’s try the same command, but this time with a MPEG-1 video instead of MPEG-4:
./mplayer -volume 50 -vf rotate=2,scale=240:320 -vfm ffmpeg -vo fbdev -framedrop http://archive.org/download/test-mpeg/test-mpeg.mpg
Finally! Not perfect, but something we can start with.
Recoding the video
As we can see the Squeezebox isn’t fast enough for any real world video playback, so we have to recode the videos (similar to watching videos on Sony’s PSP ;-)).
There are dozens of video transcoding programs for all platforms - it doesn’t matter what program or operating system you use for this step. You do, however, have to put the transcoded video on a webserver or provide a live stream (i.e. some remote protocol mplayer can handle like HTTP, FTP or RTP) if you are using a Squeezebox Radio; Touch and Controller users should also be able to use the external storage. Personally I’m using an Excito B3, a small Linux based NAS, to convert and serve the videos via HTTP.
I’m using ffmpeg for video conversion. Another popular program (also available for Windows users) would be VLC which also offers a graphical interface. Both programs also support video streaming, so if your PC is fast enough you may try to recode your video in realtime.
Example: My daily script to recode the tagesschau.de stream at 8:00 PM
#!/bin/bash -x

# Get the filename of the stream and periodically check if has been uploaded yet
cd /tmp
filepattern="`date +http://media\\\.tagesschau\\\.de/video/%Y/%m%d/TV-%Y%m%d-.*\\\.h264\\\.mp4`"
VIDEOFILE="/tmp/tagesschau.mpeg"
retries=0
while [ ! "$filename" ]; do
        wget http://www.tagesschau.de/export/video-podcast/tagesschau/
        filename=`grep -o "$filepattern" index.html`
        rm index.html
        if [ ! "$filename" ]; then
                let retries++
                if [ $retries -gt 60 ]; then
                        rm "$VIDEOFILE"
                        exit 1;
                fi
                sleep 180;
        fi
done

# Convert the stream
ffmpeg -y -i "$filename" -vcodec mpeg1video "$VIDEOFILE"
Btw: If anyone finds an all-purpose call for ffmpeg converting from any format to something suitable for the Squeezebox please post a comment :-)
Mission accomplished: Now just play your converted file, using the playback command from the last chapter :-)
Bonus: Automatic video playback
If you want to initiate playback remotely there are a few other things to consider: First of all the speaker is turned off when the Squeezebox is not active, so it has to be turned on first. I’m using the CLI interface of the Logitech Media Server to do so. To automate the calls you should also log in to your Squeezebox with a certificate (instead of username and password) to avoid being asked to enter them manually.
The following script is run on my server hosting the Logitech Media Server:
#!/bin/bash

DEVICENAME="<Name of your Squeezebox device (from Logitech Media Center)>"
SQUEEZEBOX="<IP or DNS name of your Squeezebox device>"
VIDEO_URL="<URI of the file to be played (e.g. http://archive.org/download/test-mpeg/test-mpeg.mpg)>"
USERNAME="" # Only required if your Logitech Media Server is password protected
PASSWORD="" # Only required if your Logitech Media Server is password protected

# Turn on Squeezebox
cat << EOF | expect
        spawn nc -q 3 localhost 9090
        sleep 2
        if { "$USERNAME" != "" } {
                send "login $USERNAME $PASSWORD\r"
        }
        send "$DEVICENAME power 1\r"
        send "$DEVICENAME display Video%20playback%20will%20begin shortly... 60\r"
        expect "shortly"
EOF

# Copy required programs to the Squeezebox
cd /opt/squeezebox
scp libncurses.so.5 mplayer liblzo2.so.2 libjpeg.so.62 root@${SQUEEZEBOX}:/dev

# Remotely prepare the Squeezebox and play the video
ssh root@${SQUEEZEBOX} " \
  /etc/init.d/squeezeplay stopwdog; \
  cd /dev; \
  export LD_LIBRARY_PATH=.; \
  ./mplayer -volume 50 -vf rotate=2,scale=240:320 -vfm ffmpeg -vo fbdev -framedrop "$VIDEO_URL"; \
  /etc/init.d/squeezeplay restart; \
"